![](https://blogger.googleusercontent.com/img/b/R29vZ2xl/AVvXsEiOrLFX4V_I4dDlP78Id4pnLeUoGjANCPp61D_Z1IPtKNUJa7sle6NC4i96mG3kV7TGk_jRXEPlcqiLq7cRQV_HmEr0xVsoPvSZqB2_CaaW76dM0hvvZU5Ox_SP4QkAu4d2kil3T_-niSfs/s320/background+content.jpg)
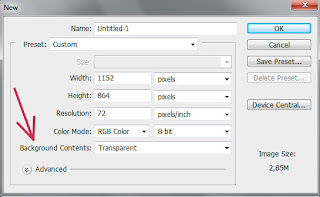
File=>New
there search for "Background Contents:" and choose "Transparent".
Thats all, now eraser will delete to transparency.
![](https://blogger.googleusercontent.com/img/b/R29vZ2xl/AVvXsEiug4jmGOJ-6a5FhXDOj_WQwuAtTaLo_2Ok0TnH2KLg6SSD6t3G0QVSVX99VhT_M6b3PiH5qlNkTKM3qlbo8zOvoLeDBEyIRg6xLsD8Ej2X1uhrfHA8NUQoV23Ihz2H9aGU6GX8ZyrTV2WM/s320/transparency2.jpg)
To get transparency on already created project, just use the Background Eraser Tool, after that normal eraser will also delete to transparency.
PS: Some formats like .jpeg and .bmp dont support transparency, so those areas will be turned white when you save. Try use .png or .tga instead.
No comments:
Post a Comment